

Introduction
In this article, we will create an app to Detect the number of faces using Python and OpenCV. This article is mainly aimed at beginners who want to use the dlib library for Python. The major idea of this article is to help beginners to understand how things work. The code given here is simple and it is easy to understand.
What is OpenCV
OpenCV is a software library that specializes in the areas of image processing, video analysis, or computer vision. It can be used to help you solve lots of problems in your field when it comes down to analyzing information in photos and videos for instance. So if you’re looking for a program that can assist you with this kind of task, then OpenCV is the option you should consider. It helps developers recognize faces by converting images into boolean values and comparing their similarities through sophisticated digital algorithms.
Step -1: Dependency Installation
Before starting to code, we have to install a few packages and software in our system.
Installing Dlib:
For installing the dlib library in your windows system first you need to install two packages
- Visual studio
- Cmake
For Visual Studio, you need to download the visual studio installer you can install that by going to this link download the installer.
After downloading Visual studio and installing it, you can launch the program and select desktop development with c++, and make sure to select the C++ Cmake tools for windows and install it. The file is quite big so it will take some time to install.

For cmake, you can simply copy-paste the given below common in your system command prompt
pip3 install cmakeAfter installing both the packages you can simply install the dlib library by using this command in your command prompt
pip3 install dlibNote: For Linux, you just have to install Cmake before installing dlib you don’t need Visual studio in Linux and the rest of the process should be the same
Installing Opencv:
You can install OpenCV using the pip command, the code is given below you can just copy-paste that in your terminal/command prompt.
pip3 install opencv-pythonInstalling numpy:
For numpy, it’s the same process as the OpenCV just copy-paste that in your terminal/command prompt.
pip3 install numpyNote: For Opencv and Numpy the process should be the same for installing the packages in both Windows and Linux
Step -2: Coding the App
#importing opencv
import cv2
#importing numpy
import numpy as np
#importing dlib
import dlib
Here we imported our required library we need to import three libraries OpenCV. Numpy and dlib
video=cv2.VideoCapture(0)So now let’s create a video variable that will basically capture the video from our webcam and we are using (0) here because we need to take input from our webcam that is available on channel 0
#creating the detector object
detector=dlib.get_frontal_face_detector()
In this line of code, we called our get Frontal phase detector class from the dlib library, which can detect the frontal facial elements using information taken from our web camera.
while True:
    #extracting the video
    ret,frame=video.read()
    #flipping the frames
    frame=cv2.flip(frame,1)
Here we created a wild true infinite loop so that the frame is running constantly and the picture that is captured in our webcam is converted into video because we know that video is a slideshow of the picture, after that, we extracted the video that is present in our video variable.
    #converting image into grayscale
    gray=cv2.cvtColor(frame,cv2.COLOR_BGR2GRAY)

    face=detector(gray)
In this line, we converted our input from the webcam which is colored input into grayscale. We have used cvtColor calls for opencv now this CVT class openCV accepts two parameters first is the frame that is the input from the webcam and the second one is cv2.COLOR_BGR2GRAY. [So why do we need to convert the colored input into grayscale – we convert our colored image into the grayscale image to increase the precision of the object detection and to decrease the time and processing power of the program ]
    #creating the faces variable
    face=detector(gray)
So in this line, we created this faces variable that will use detector=dlib.get_frontal_face_detector() class and we are applying this object to this gray image and the output of these faces will be four values the starting X and the starting Y and the height and the width these are the values that the detector class will provide and faces variable will store. below is an example with an image that will help you understand more

num=0
for faces in faces:
        x,y=face.left(),face.top()
        hi,wi=face.right(),face.bottom()
        #implementing the cv2 dot rectangle method
cv2.rectangle(frame,(x,y),(hi,wi),(0,0.255),2)
        #incrementing i
        num=num=1
Here we created a num variable which will be initially 0 because it will store how many faces are there it will be incremented after each face is detected. Then we’ll create a for loop which will literate to this faces variable and we’ve used the cv2 dot rectangle method which will draw the rectangle around our face. This rectangle method accepts this parameter first is the frame (the picture) then the X-axis and Y-axis then height and width then color and lastly width of the frame around the faces.
cv2.putText(frame, 'face'+str(num),(x-12,y-12),cv2.FONT_HERSHEY_PLAIN,0.7,(0,255,0),2)Here we used the cv2 dot put text method to put the number of the faces text in the frame around the faces. This method accepts the following parameter first is the frame then the face then the number of faces then the position. Here all the face detection part is done the only thing left is showing the user the image:
    cv2.imshow('faces',frame)

    key=cv2.waitKey(1)
    if key==ord('q'):
        break

video.release()
cv2.destroyAllWindows()
Here we released our video and destroy all window
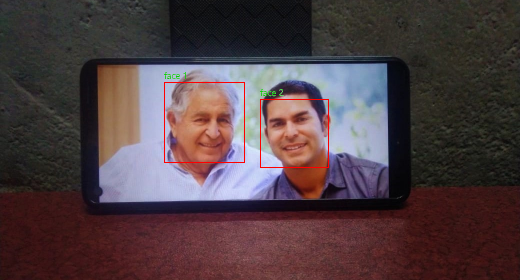
Output:
Once you’ve reviewed all the steps and made sure everything is correct, it’s time to run the code. Before you do, you should make sure your web camera works first – because that doesn’t help if your computer isn’t physically able to connect with the one attached to your face! When you hit enter or run that code, you should see a rectangle around your face on screen with a number assigned to it – those are the number count of the face. See? this is how you detect the number of faces using Python and OpenCV.
And in your terminal its should be something like this

Conclusion:
In this tutorial, we have discussed how to Detect the number of faces using Python and OpenCV library. It is easy to use as the library has pre-trained libraries that can be used to detect faces. This tutorial was built using python and included instructions on how to install OpenCV and dlib on both windows and Linux environments. We hope that you enjoyed this tutorial, if you have any questions or suggestions, please ensure to leave a comment below! Thank you for reading.
Here are some useful tutorials that you can read: