

Real-time applications like WebSockets are used each and every day, now more than ever with the rise of social media websites such as Twitter, Google+, and Facebook among others. Servers push updates to clients instead of polling for changes on a regular interval – this is what’s known as a “WebSocket”. All in all, it’s been a fantastic advancement but it has its drawbacks which have proved problematic for Python developers. This article will help you to create websocket server using Python.
With the latest developments to the Python language and with the help of frameworks such as Tornado, handling Websocket or HTTP/2 connections has become much easier. Tornado is a Python networking library that enables developers to construct HTTP servers in Python and which offers them an opportunity to tackle WebSocket and other network transmissions more easily. Tornado provides web server capabilities in Python that allow experienced developers to better handle these connections.
This article will illustrate the concepts of asynchronous programming and handling multiple connections. we’ll demonstrate how to set up a simple chat room server and allow multiple clients to connect to it.
What are Websockets?
WebSocket is a communications protocol, providing full-duplex communication over a single TCP connection. WebSocket is a combination of technologies that allows for full, two-way communications between a browser and a server. This facilitates real-time data transfers, as it allows you to control the client and server endeavors simultaneously without delay. It has a lower overhead than half-duplex alternatives such as HTTP polling, facilitating real-time data transfer from and to the server.
The low latency and multi-directionality of WebSockets is especially useful for applications that need to send or receive messages while receiving replies from the server. Because WebSockets begins with an HTTP request, they’re 100% compatible with existing web infrastructure, and can even run on the same port as your existing web requests such as those that are made over ports 80 or 443 (for example). This compatibility makes cross-origin security simpler, which means that anyone on either client or server-side infrastructure doesn’t have to modify their networks in order to support secure communications using WebSockets.
Prerequisites
When adding WebSocket support to your application, you need to use a web server like Tornado which has built-in WebSocket support.
Tornado comes with its own implementation of WebSocket that helps to create websocket server using Python. For the purposes of this article, this is exactly what we will need. If you have zero experience and no idea with this stuff, reinventing the wheel might not be a great idea. Instead, starting with a working example and understanding it would be the best approach for you, and that’s exactly what we’ll be doing here!
The code uses the concept of WebSockets and the Tornado networking library using the Python language, and that’s all the things we need. We can install WebSockets and Tornado using the following pip commands:
pip install tornado
pip install websockets
Setting up main.py File
The chat room server and the chat room client are implemented together in a single file for simplicity’s sake. First, create a file main.py file and import the required modules to create websocket server using Python:
#main.py

import tornado.escape  #for escaping/unescaping methods for HTML, JSON, URLs, etc
import tornado.ioloop  #event loop for non-blocking sockets
import tornado.options  #command line parsing module to define options
import tornado.web  #provides a simple web framework with asynchronous featuresfrom tornado.options import define, options
import tornado.websocket  #implementation of the WebSocket protocol and bidirectional communication
import logging
import os.path
import uuid

from tornado.options import define, options
Defining the rest of the functions, including the clients’ side. All the things you may need to know are predefined in the code given below:
define("port", default=8080, type=int)  #setting the port to 8000 which can easily be changed


class Application(tornado.web.Application):  #setting a tornado class as a web application
    def __init__(self):
        handlers = [(r"/", MainHandler), (r"/chatsocket", ChatSocketHandler)] #setting the nesassary urls
        settings = dict(
            cookie_secret="__TODO:_GENERATE_YOUR_OWN_RANDOM_VALUE_HERE__",
            template_path=os.path.join(os.path.dirname(__file__), "templates"),  #providing the templates path
            static_path=os.path.join(os.path.dirname(__file__), "static"),  #providing the static folder's path
            xsrf_cookies=True,
        )
        super().__init__(handlers, **settings)


class MainHandler(tornado.web.RequestHandler):
    def get(self):
        self.render("index.html", messages=ChatSocketHandler.cache)
Defining the WebSocket handshake
class ChatSocketHandler(tornado.websocket.WebSocketHandler):  #creating our main websocket class
    waiters = set()  #set number of joinable users
    cache = []
    cache_size = 200

    def get_compression_options(self):
        #non-none enables compression with default options.
        return {}

    def open(self):  #accepts a connection request and stores the parameters, a socket object for that user
        ChatSocketHandler.waiters.add(self)

    def on_close(self):  #removes the user by removing the object
        ChatSocketHandler.waiters.remove(self)

    @classmethod
    def update_cache(cls, chat):  #Maintains a list of chat for broadcasting the messages
        cls.cache.append(chat)
        if len(cls.cache) > cls.cache_size:
            cls.cache = cls.cache[-cls.cache_size :]

    @classmethod
    def send_updates(cls, chat):  #mange sending messages
        logging.info("sending message to %d waiters", len(cls.waiters))
        for waiter in cls.waiters:
            try:
                waiter.write_message(chat)  #outputting the messages
            except:  #except, in case of any errors
                logging.error("Error sending message", exc_info=True)

    def on_message(self, message):
        logging.info("got message %r", message)
        parsed = tornado.escape.json_decode(message)
        chat = {"id": str(uuid.uuid4()), "body": parsed["body"]}
        chat["html"] = tornado.escape.to_basestring(
            self.render_string("message.html", message=chat)
        )

        ChatSocketHandler.update_cache(chat)
        ChatSocketHandler.send_updates(chat)
The WebSocket protocol defines two specialized types of transmissions: the WebSocket handshake (send_updates) and the WebSocket message (on_message). The WebSocket handshake is used to establish a connection between the client and server, while the WebSocket message is sent after the connection has been established.
def main():  #and to close up everything
    tornado.options.parse_command_line()
    app = Application()
    app.listen(options.port)
    tornado.ioloop.IOLoop.current().start()


if __name__ == "__main__":
    main()
And lastly, close the main function (which contains the WebSockets).
Setting up Templates
After creating the above file, we now have to create the template and static files. As defined earlier, we’ll first have to create the folders to keep these files in, which would be named “templates” and “static”. We can start by creating the templates as shown:
#templates/index.html

<!DOCTYPE html>
<html>
  <head>
    <meta charset="UTF-8">
    <title>Tornado Chat Demo</title>
        <link href="https://cdn.jsdelivr.net/npm/bootstrap@5.1.3/dist/css/bootstrap.min.css" rel="stylesheet" integrity="sha384-1BmE4kWBq78iYhFldvKuhfTAU6auU8tT94WrHftjDbrCEXSU1oBoqyl2QvZ6jIW3" crossorigin="anonymous">
  </head>
  <body>
    <div id="body">
      <div id="inbox">
        {% for message in messages %}
          {% include "message.html" %}
        {% end %}
      </div>
      <div id="input">
        <form action="/a/message/new" method="post" id="messageform">
          <table>
            <tr>
              <td><input type="text" name="body" id="message" style="width:500px"></td>
              <td style="padding-left:5px">
                <input type="submit" value="{{ _("Post") }}">
                <input type="hidden" name="next" value="{{ request.path }}">
                {% module xsrf_form_html() %}
              </td>
            </tr>
          </table>
        </form>
      </div>
    </div>
    <script src="https://ajax.googleapis.com/ajax/libs/jquery/3.1.0/jquery.min.js" type="text/javascript"></script>
    <script src="{{ static_url("chat.js") }}" type="text/javascript"></script>
  </body>
</html>
And now the static files:
#static/chat.js

$(document).ready(function() {
    if (!window.console) window.console = {};
    if (!window.console.log) window.console.log = function() {};

    $("#messageform").on("submit", function() {
        newMessage($(this));
        return false;
    });
    $("#messageform").on("keypress", function(e) {
        if (e.keyCode == 13) {
            newMessage($(this));
            return false;
        }
    });
    $("#message").select();
    updater.start();
});

function newMessage(form) {
    var message = form.formToDict();
    updater.socket.send(JSON.stringify(message));
    form.find("input[type=text]").val("").select();
}

jQuery.fn.formToDict = function() {
    var fields = this.serializeArray();
    var json = {}
    for (var i = 0; i < fields.length; i++) {
        json[fields[i].name] = fields[i].value;
    }
    if (json.next) delete json.next;
    return json;
};

var updater = {
    socket: null,

    start: function() {
        var url = "ws://" + location.host + "/chatsocket";
        updater.socket = new WebSocket(url);
        updater.socket.onmessage = function(event) {
            updater.showMessage(JSON.parse(event.data));
        }
    },

    showMessage: function(message) {
        var existing = $("#m" + message.id);
        if (existing.length > 0) return;
        var node = $(message.html);
        node.hide();
        $("#inbox").append(node);
        node.slideDown();
    }
};
Also, create a message.html file that will contain some of the additional js code.
#template/message.html

<div class="message" id="m{{ message["id"] }}">{% module linkify(message["body"]) %}</div>
And it’s all ready!
Output
Run the project by running the name of the file in the terminal, but would print out no response, unless there is an error. We’ll have to go to the port that we defined earlier, which was 8080. Open this link http://127.0.0.1:8080/ and you should see something like this:

You can try and open a different browser to see if it works or not, and after posting something you should also see responses print out on your terminal as well:

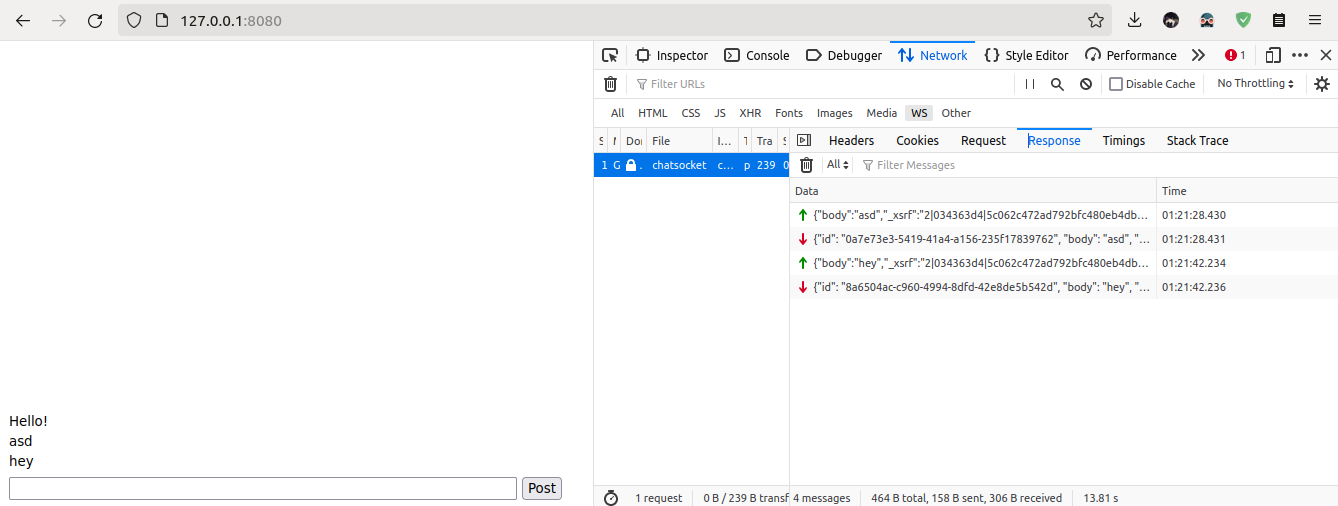
To check its asynchronous abilities or what we actually did with WebSockets you can inspect its network performance using any plain old browser:
Conclusion
And that’s it, in this article we have learned how to create websocket Server using Python and the Tornado network library. Now, there is a lot of room for improvement here such as authentication. There are also many other libraries that you can also use but Tornado is the most beginner-friendly by far and has a documentation library, if you want to research further that’s the best place to go.
Also, you can refer to this file structure if you get lost:
│   main.py
│   playbook.yml
│
├───static
│       chat.js
│
└───templates
        index.html
        message.html
Here are some useful tutorials that you can read:
- Concurrency in Python
- Basic Neural Network in Python to Make Predictions
- Instagram bot – posting images, auto like, and bulk follow
- Monitor Python scripts using Prometheus
- Create News Aggregator Site using Python
- Convert an image to 8-bit image
- Create Sudoku game in Python using Pygame
- Get Weather Information using Python
- Create APIs using gRPC in Python